
Create and Manage Group
How to Create a Group
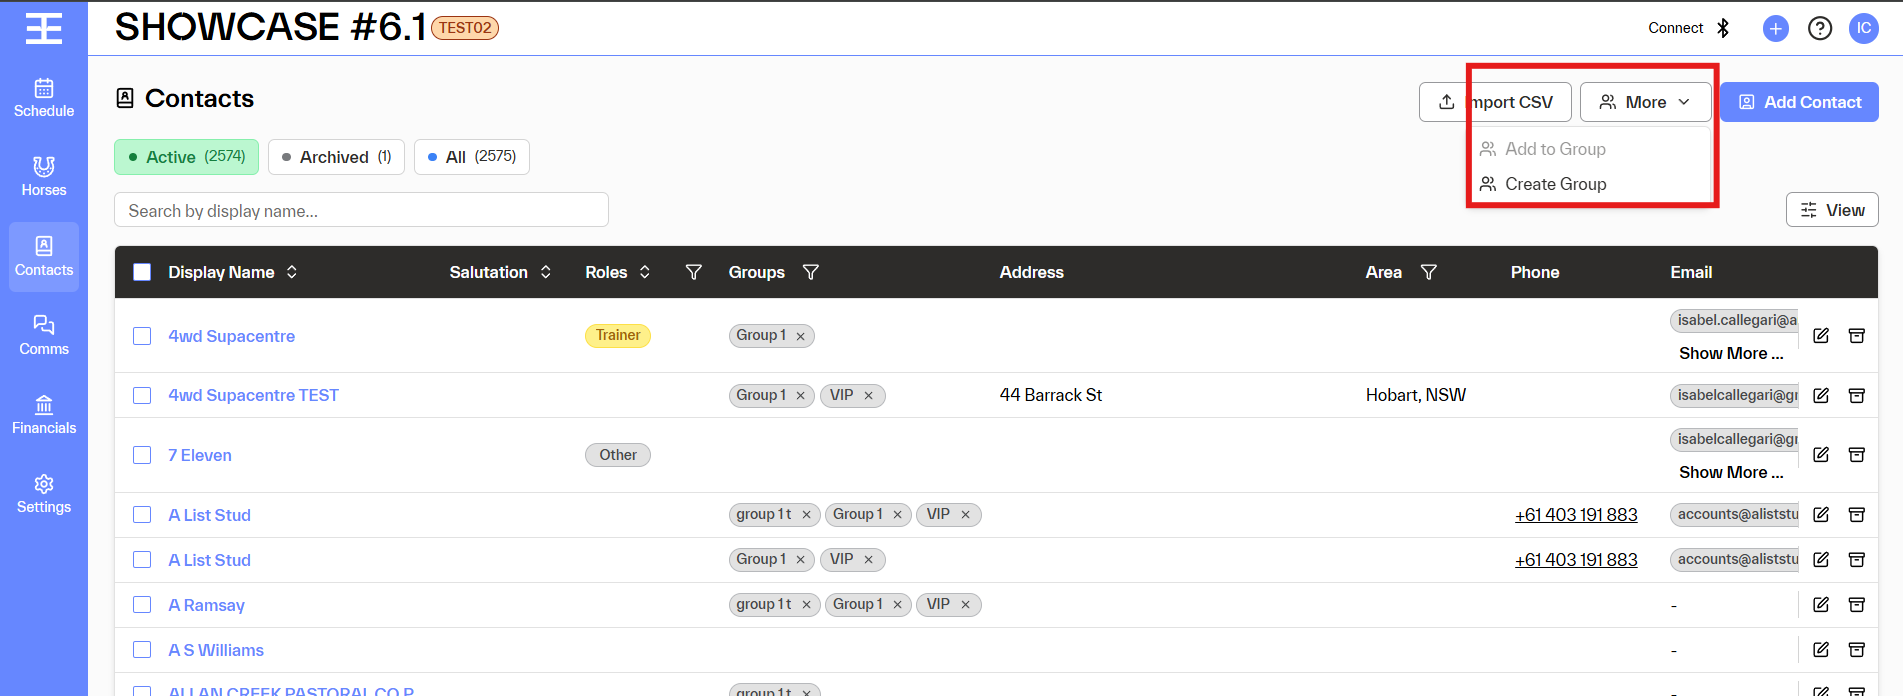
You can create a new group directly from the Contacts screen in two easy steps.
- Navigate to Contacts in the left-hand navigation bar.
- Click the More button in the top-right area of the Contacts screen
- Select Create Group from the dropdown menu.
- A slide-over panel will open on the right-hand side of the screen.
You could also started by selecting the contacts from the contact list and then More> Create Group will automatically show the contacts selected.
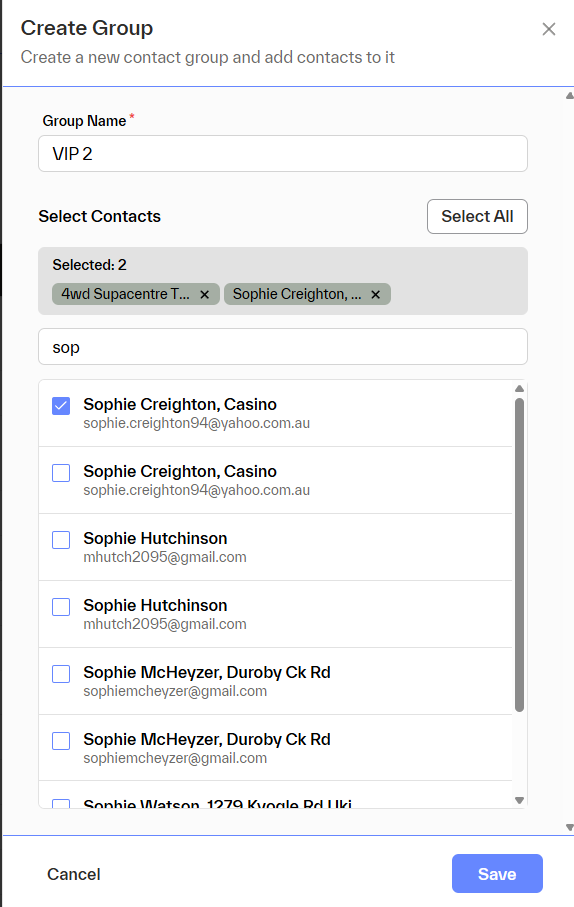
Step 2 — Name your group and select contacts
- Enter a Group Name (required). Group names must be unique.
- Use the search field to find specific contacts, or scroll through the full list.
- Tick the checkbox next to each contact you want to include. Use Select All to include every contact.
- Click Save to create the group. The group will immediately appear in the Groups column for all assigned contacts.
💡 A contact can belong to multiple groups. There is no limit on how many groups a contact can be added to.
Validations & Rules
| Rule | Behaviour |
| Group Name required | You cannot save a group without entering a name. |
| Unique names only | If a group with the same name already exists, you will see an error: "A group with this name already exists. Please choose another name." |
| Max 100 characters | Group names are limited to 100 characters. Leading and trailing spaces are automatically trimmed. |
| No duplicate memberships | If a contact is already in a selected group, the system skips re-adding them and shows a summary message. |
| Multiple groups allowed | A single contact can belong to any number of groups simultaneously. |
| Action | How to trigger | What happens |
| Unlink a contact from a group | Click × on the group badge in the Contacts list | Contact is removed from the group. Group remains intact. Toast confirmation shown. |
| Edit a group (rename or update members) | Click the group name/badge in the Contacts list | Edit Group slide-over opens. Update name or contacts, then Save. |
| Delete a group | Click the group name/badge → click the 🗑 Delete icon in the slide-over | Delete confirmation modal appears. Click Continue to permanently delete. |
Unlinking a Contact from a Group
Unlinking removes a single contact's membership from a group. The group itself is not affected — all other members remain, and the group continues to work normally across business rules and communications.

How to unlink
1. Locate the contact
Find the contact in the Contacts list. Their group memberships appear as badges in the Groups column.
2. Click × on the group badge
Click the × on the specific group badge you want to remove this contact from.
3. Done
The contact is immediately unlinked. A toast notification confirms: "[Contact Name] removed from '[Group Name]'."
💡 No confirmation is required — unlinking is reversible. You can re-add the contact to the group at any time via More → Add to Group.
Editing a Group
You can rename a group or update its contact membership at any time. Editing is done through the Edit Group slide-over, which opens when you click on a group name or badge in the Contacts list.
How to edit
1. Click the group name/badge
In the Groups column of the Contacts list, click the group name (not the ×). The Edit Group slide-over will open on the right.
2. Update the Group Name (optional)
Click into the Group Name field and type a new name. Names must be unique and no longer than 100 characters.
3. Update contact membership (optional)
Contacts currently in the group are shown with their checkboxes ticked. Tick additional contacts to add them, or untick existing members to remove them. Use the search field to find specific contacts quickly.
4. Save your changes
Click Save. All changes take effect immediately and are reflected across the Contacts list, business rules, and any draft communications using this group.
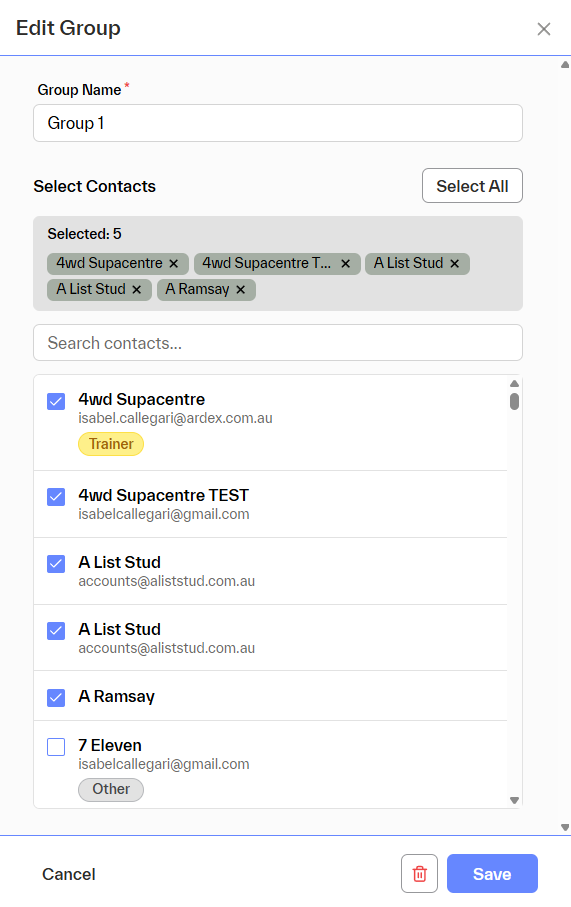
💡 The Selected count at the top of the slide-over updates as you tick and untick contacts, giving you a running total before you save.
Deleting a Group
Deleting a group permanently removes it from EPONA. This action cannot be undone and will affect any business rules or draft communications that reference the group.
⚠️ Deleting a group removes it from all associated business rules and draft communications. Review these before proceeding.
How to delete
1. Click the group name/badge
In the Groups column of the Contacts list, click the group name (not the ×). The Edit Group slide-over will open.
2. Click the Delete icon
Click the 🗑 delete icon in the bottom of the slide-over (next to the Save button).
3. Confirm deletion
A confirmation modal will appear: "Are you sure you want to continue? Deleting '[Group Name]' cannot be undone. Group will be removed from any current business rule or draft comms."
4. Click Continue
Click Continue to permanently delete the group. Click Cancel to go back without making any changes.
💡 Individual contacts are NOT deleted when a group is deleted — only the group itself is removed. Contacts retain all their other data and group memberships.